Showing posts with label 3-D project. Show all posts

Saturday, October 1, 2011

Designer Day One ~ Birthday Princess Crown by Lauren Bergold

there are a great many benefits to being the aunt of three lovely and adorable nieces, but i have to confess that my favorite is having a really good excuse to make things like THIS:


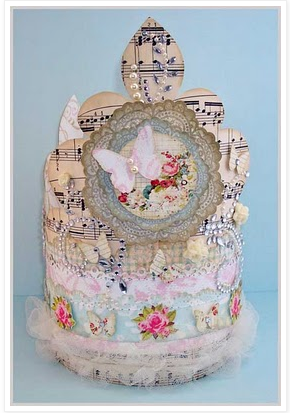
yes, it's an official PRINCESS CROWN made entirely from the pixie dust anniversary kitBLUE MOON, which i had the honor of assembling with pixie-in-chief kirsty vittetoe! you may recall that i made a different crown in february with the MY FUNKY VALENTINEkit, for my niece riley. this edition will be given to her sister, lindsay marie.


one of my favorite ingredients in this kit is the vintage sheet music, something i use A LOT OF in my crafty life! i love the softly aged patina of it, and the way it adds a subtle festive feeling to any project. in this case i glued it to my crown's base, which is constructed from a double layer of 9x18" heavy duty cardstock cut into an appropriately fancy crown shape. to embellish the circumfrence i punched some long border strips from two of the gorgeous girls' paperie prints, AND the pretty pink packaging from the melody ross epoxy stickers! i overlapped these as carefully as possible and after using my xyron to adhere them, ran my sewing machine around a few times to make sure they'd be attached permanently!


you need a really good centerpiece to make a crown look seriously princessy, in my opinion! this one is made of fussy-cut doilies from pink paislee "dew drops" paper, a 2' circle punched from the packaging of the kit's prima gem flourish, and surmounted by a a sweet butterfly. i've embellished the area around this icon with the carefully cut-apart-and-reassembled gem flourish. i have to confess that this is the one place i CHEATED on this project: i added in bits of a second, similar flourish from my own stash. and really, one flourish was enough... i just couldn't resist going a little bit crazy!


i repeated the circle + butterfly + gem motif in a scaled-down version on each side of the crown. i inked the edges of each element with a subtly aging shade of distress ink to tie all of the colors and patterns together, and used layers of foam tape to give each element dimension.


to fasten the crown into a circular shape, i punched five holes on each end, set them with eyelets from my own stash, and threaded them in the manner of a corset, with pale tan seambinding that i tied into a double bow. along the bottom edges, for a final glamorous touch, i added a frothy layer of creamy tulle, that i gathered and sewed for maximum impact.


on the inside of the crown i stamped a random flourish pattern in a soft brown ink, just to alleviate the stark white of the cardstock. and thus my "birthday crown" is ready to bestow upon the beautiful princess lindsay! ♥


Kirsty's Note -
Oh my, Princess Lindsay Marie is going to be so happy with a princess crown crafted specially just for her, what a beauty!!! Thanks Pixie Lauren, not just for this lovely piece of work but also putting together this fabulous "BLUE MOON" kit together!

At The Pixie Shop
Pixie October Kit "Blue Moon" will be on sale at The Pixie Shop on October  5th, look out for this fun and fabulous kit!

We are celebrating our 1st birthday with lots of specials this month, do look out for *Anniversary Alert* at the Pixie Blog, you might pick up some really GREAT DEAL!!!!

Pixie September Challenge
You still have time to link up with our September Challenge (ends Oct 5)
Here's the sketch

Click HERE for details or to link your entry

Pixie October GIVEAWAY
Do you want to be the proud owner of this?

Pixie November Kit "SNOW SHOW" could be yours, click HERE to enter the GIVEAWAY!

Photobucket

Monday, August 8, 2011

"beach babies" altered frame by lauren bergold

i confess i am a bargain junkie. the other day, in the office supply store, when i saw this very plain, black, utilitarian multi-photo frame for just $3... i pounced! because i knew i had two secret weapons which would completely banish its boringness: #1 the august pixie dust kit PICNIC BASKET and #2 a set of uber-cute beach photos of my nieces and nephew.

was i right, or what?! :)


i actually think having either one of these secret weapons would've been enough; the PICNIC BASKET kit has soooooooooo many beautiful, summery papers and cute, colorful embellishments that you really can't go wrong. as for the photos... they're sort of hard to beat, if a proud auntie might be excused for bragging. but the colors of both really are PERFECT together, don't you think?


i started by trimming and punching some strips of the girls' paperie "gingham stripe" paper to go around the edges of the frame. next i popped the pebbles tissue paper flowers into one corner...


...and american crafts' butterfly delights into the center. (the black stick-on pearls were my only "cheat"... i couldn't resist adding them as a finishing touch at the very end.)


i only had four photos and the frame had five slots, so i made a little title using one of the tags in cosmo cricket's 12x12 "odds and ends" sheet and some leftover girls' paperie alphabets from last month's MIDSUMMER NIGHT'S DREAM kit.


finally i cut out a few of the festive banners from the girls' paperie "party pennants" paper, affixed them to the top of the frame, and called it a day!


there is only one tiny problem: two of these adorable "beach babies" are my brother's kids, and the other two belong to my sister. since i'd like to stay on speaking terms with BOTH of them, i think i'm going to need another frame. see you in the clearance aisle! :)


Kirsty's Note -
Look at those beach babies, what a proud aunt you are!
So is the project, so pretty! Thanks Pixie Lauren!

At The Pixie Shop
For card makers and those who do not need a huge kit, Pixie has 2 mini kits for you in August

Here's August Mini Kit #2 - At The Park ($17.90)


List of items included in August Mini Kit #2 At The Park can be found HERE!
Limited quantity, get yours now!!!

August GIVEAWAY

So what do you need to do to be in the running for this? Check it out HERE!!!

Photobucket

Tuesday, August 2, 2011

Designer Day 2 ~ "magnetic personality" gift set by lauren bergold

would you believe: my mom tried to *STEAL* this project!!!

ok, i'm exaggerating; my mother is a scrupulously honest woman and would never take anything which didn't belong to her; but when she saw this particular pixie dust project, made with august's admittedly ♥fabulous♥ PICNIC BASKET kit, she made it very clear that she would not be displeased if it were ultimately intended for her. she even went so far as to remind me that her birthday is in september! :)


it has to be said, the mix of paper and embellies here *IS* completely crave-able! girls' paperie, cosmo cricket, american crafts, october afternoon, pink paislee... what's not to like, right? i used them to decorate this cute little tin, inside and out. but wait, there's a surprise:


yes, the tin--which originally contained paper flowers--holds a little gift set: a sweet minature card and half a dozen paperdoll-inspired magnets!


the card has a mix of cosmo cricket papers, including the little vintage girl, who, like her magnetic sisters and brother, was cut from the "trinkets" paper. the sentiment is made up of october afternoon "seaside" alphas and a girls' paperie word sticker leftover from last month's MIDSUMMER NIGHT'S DREAM kit, placed on a cosmo tag.


i used the magnet cartridge in my xyron machine to simultaneously affix thin flexible magnet stock to the back of the paper and lamination to the front, then i cut carefully around each little figure. if you don't have an adhesive machine you can purchase sheets of similar material from the office supply store, or even just attach self-adhesive magnet strips from the craft store to the back of each doll.

i used fast grab tacky glue to permanently affix all of the different papers to the front, back, sides and inner surfaces of the tin. as always, i cut my pieces very slightly smaller than each plane to which i was attaching them, and inked around the edges. since i know that i will NEVER achieve perfection on a project like this, i like to take the pressure off by making any little mistakes look intentional!!! :)

finally i attached one last pretty paper doll to the top of the box, affixed a cosmo cricket sentiment sticker, and added an american crafts butterfly adorned with a girls' paperie mini cameo. and now i think i better give this to my mom, lest she turn to a life of crime, lol! :)


Kirsty's Note -
WOW, this is BRILLIANT!!! You best project ever!!!! Thanks Pixie Lauren!!!!

At The Pixie Shop

Pixie Dust Paperie August Kit Picnic Basket will be on sale August 5 at The Pixie Shop, but we have the EARLY BIRD SPECIAL just for you!
Purchase Picnic Basket between August 2-4 (based on EST), you will get a 15% discount on the newest pixie kit, what a treat for our Pixie Followers.
Use code Summertime during check out to enjoy this special offer, 3 days only!!! Stop by the Pixie Shop and grab yours now!!!

Pixie July Challenge
You still have time to join us for our July Challenge
it is all about butterfly

Click HERE for details or to link your entry!!!


August GIVEAWAY
This is what you could win

Click HERE to enter the GIVEAWAY!!!

Photobucket

Saturday, July 23, 2011

garden photo tray by lauren bergold

have you seen the fabulous tim holtz "configurations" line of shadow boxes yet? i love them, and my favorite one is the printer's tray, so i was really excited when pixie-in-chief kirsty vittetoe said we'd be getting them in the pixie shoppe! i used my MIDSUMMER NIGHT'S DREAM kit... and a whole lot of photos... to fill this one!

the photos are of my mother's garden, and have been taken over the course of the last several years by the two of us. any time a particular section was looking especially nice, or a type of flower was fully in bloom, one of us would snap away at it! when i started working on this project, i made a grid in printshop (my favorite graphics program) and used it to size and crop the pictures until i had an arrangement i liked. then i printed them on photo paper and trimmed them to fit the sections of the box. (i've posted a bunch of the full-sized, un-retouched, photographs on my personal blog today, if you'd like to see more.)

pink paislee's "butterfly garden" is one of my favorite paper lines, and the "butterfly wings" paper that's in the july kit is utterly beautiful. i cropped a bit of it to fit three sections in the lower left of the tray.


my mom adores fairies--and pixies!--so i couldn't resist adding this pretty sprite from the "botanical gardens" paper. the tim holtz ornate plate is from march's FLORIBUNDA kit, and i've filled it with another photo labelled "le jardin 2011".

to balance the tray, i added another smaller vignette from the "butterfly wings" paper in the upper right, and affixed one of the lovely girls' paperie vintage whimsy trinkets. i must confess here that the lacy trim is my only cheat in this project. when the tray was "finished" i still thought it needed one more thing... i just didn't know WHAT. one day at my mother's house, i found this pretty trim in her sewing room and i knew it was THE THING!!! :)

i mentioned that fairies are a theme in the garden, and this one is my mom's favorite. she's featured prominently under the chestnut tree and next to the birdbath that is visible from the kitchen window. i loved this photo of her, and decided to use it as the centerpiece of a little "surprise" in the tray.

yes, it's a little accordion book with even MORE photos in it, that can be taken out of the tray and unfolded to reveal more garden beauty!

i built this little book on an 18" wide sheet of cardstock that i trimmed and folded to fit the 3.5 x 5.5" section of the tray. again i selected and sized the photos in my graphics program before printing, so i knew they'd look well together.

there are five photos on the front, and five more on the back. i hid a few basic grey magnetic snaps under the pictures to keep the book closed, and added a little bit of luscious pixie crinkled ribbon to tie it together.

my mother's birthday is in september, but i *think* she's going to get her gift early this year, because i CANNOT wait that long to show her this!!! ♥


Kirsty's Note -
WOW WOW WOW...... I bet your mom is going to LOVE this! Another brilliant project, thanks Pixie Lauren!!!!!

At The Pixie Shop

Tim Holtz Configurations Print Tray
get it at The Pixie Shop

Pixie July Challenge
It's all about butterfly
Come on and join in the fun, link up your butterfly project here!!!!

Photobucket

Saturday, July 2, 2011

Designer Day 2 ~ heart-shaped trinket box by lauren bergold

i've said it before, but it bears repeating: the number one reason to buy a pixie dust paperie kit (such as this month's MIDSUMMER NIGHT'S DREAM!) is that all of the hard work of picking out and coordinating the most awesome new products is already accomplished; pixie-in-chief kirsty vittetoe has done it for us! so we can sit right down and make something straightaway. like this:


i love little trinket boxes. this one came from the big box craft store and cost less than a dollar, which is quite good value when you realize i will use it to bestow a little present, and then the recipient can use it for something, as well!

projects like this are easy and fun, especially when you have such a beautiful mix of soft colors and patterns. i've got prints here from american crafts, pink paislee, graphic 45, and glitz design; i think i could've spent HOURS agonizing over my entire stash without coming up with a mix half as lovely as this!

inside the lid of the box you can see i've hidden a little surprise--it's a coordinating heart-shaped card. i'm imagining this box as part of an anniversary gift, maybe filled with hershey's kisses?! so i think the simple "love" sentiment built from girls' paperie alphabet stickers is just right.

i used my collection of flower dies, some distress inks, and a liberal spritz of water to create layered and distressed dimensional flowers for the top of the box and the card. the smaller one is surmounted by a girls' paperie "jubilee" blossom; the larger is built around a pebbles felt rose that i have glimmer-misted a soft pink.

as always, i've colored the edges of the box with a permanent marker that tones with the distress inks used on the edges of the papers. this ensures that any little gaps between the various surfaces of the box look intentional and "finished" whilst also making the trimming & fitting of the pieces quick and easy. i use fast-grab tacky glue and a disposable brush to coat each piece liberally and affix it securely to the box.

i just hope my brother and his wife will ♥LOVE♥ their little anniversary box as much as i loved making it! :)


Kirsty's Note -
Absolutely gorgeous!!! They will love this little anniversary box for sure!!!

Pixie June Challenge

Here's the inspiration photo for Pixie June Challenge, courtesy of Georgianna Lane
Find out the details HERE or to link your entry!!!

Pixie July GIVEAWAY
We are giving away THIS to one lucky follower

Find out how you could be the lucky one!!!

Photobucket

Wednesday, June 1, 2011

Designer Day 1 ~ business card purse by lauren bergold

my sister amie is an "initials inc" consultant who sells their gorgeous line of personalized and monogrammed handbags, totes and accessories online and at home parties. so when i saw this adorable little wooden purse at michaels, i thought what a brilliant home it'd make for her business cards; and the SUMMER OF LOVE kit has everything i needed to pull that off: fabric-inspired papers, gorgeous teresa collins trimmings, and even some fabulous gems!


how beautiful is the lace paper from teresa collins' "posh" line? you get a sheet each of pink and black in the kit, and they are both double-sided, as well! i paired the pink with some tailored pinstripes on the sides of the purse.

for the lining, i used the front and back of the glittery rose paper, which of course coordinates perfectly with the outside. the purse's natural pale wood tone looked ok, but i thought it'd be even better in PINK. i considered paint, but sometimes painted surfaces stick together, and that is just NOT fashionable, so i employed one of my favorite tricks instead: i "stained" the wood using a permanent marker!


finally it was time to embellish. OF COURSE i needed to create a cool monogram, which i did by using the same pink glitter marker on the kit's white "thickers" alphabet, and also on a larger pink paislee cardboard letter leftover from march's FLORABUNDA kit. for extra flair i added a couple of black gems.

a line of pink rosebud trim is never a bad idea, is it?! and the pixie dust signature crinkled seam binding has a zillion uses: in this case it perfectly wraps the purse's handle. a couple of punched butterflies later and my project was complete. the only problem is my sister's birthday is A WHOLE MONTH away... and i'm just not sure i can wait to give her this... :)


Kirsty's Note -
That is absolutely ADORABLE!!!!! Thanks pixie Lauren!!!!

At The Pixie Shop
Get Ready! You so don't want to miss this rare opportunity!

Once in a while we have a little Crinkle Ribbon Bundle for our Pixie Signature Ribbon Lovers out there, pick any 3 bundles (5 yards each), so you are getting 15 yards of Pixie Crinkled Ribbon for just $5.90, they run out really really fast, don't miss this, no code needed, just pick your colors and remember to leave the names of the crinkled ribbon in the comment box so we know what to send in your package

Pixie May Sketch Challenge
Come play along with us
Click HERE to see what you could win or to link your entry!!!

Pixie June GIVEAWAY
Wanna win this?

Click HERE to find out how!!!!
Photobucket